Smoked brisket in your backyard is, without a doubt, one of the hardest things to cook perfectly.
Despite all the articles, books and videos out there telling you how to do it, there is no magic to the process.
You need tremendous patience and you need to know the specific characteristics of your pit. That takes practice and experience. The more you cook, the better you'll be.
The approach may sound simple and straightforward, but getting there is not.
10 Tips - Smoke brisket in your backyard
Here are my 10 essential steps to smoking a backyard brisket on an offset, log-burning pit. Some of the techniques may work for other types of smokers, such as a Weber Smokey Mountains, but not all. (I cook on stick burners (offset pits) & cannot address techniques specific to Smoky Mountains, Green Eggs, pellet cookers, gravity pits or charcoal pits.)
1. Start with a good piece of meat. Find a source that sells 12-15 pound packer trim briskets: Choice or Prime Wagyu, but not Select. Even though you can successfully produce good Select grade briskets, for a few extra bucks get the Choice to insure better results.
2. Trim the fat to 1/4 inch, plus/minus on the top and sides, so it will render down along with the rub and get into the meat. If you do not feel comfortable trimming briskets, skip this step and do not panic about it.
3. Pick any of your favorite commercial beef rubs and spices. There's a million of them out there. Some people apply the rub several hours before cook time. Some grind their spices in a coffee grinder for better consistency. Some even add a finishing rub -- midway through or near the end of cooking -- to enhance flavor. Try a simple Texas favorite by combining: (8 tbsp.) fresh course ground black pepper, (3 tbsp.) Kosher salt, (1 tsp.) granulated garlic, (1 tsp. cayenne), (1 tsp.) granulated onion. This makes about 3/4 cup which will season a large packer trim brisket.
4. Fire your pit. It's best to build a small fire that breathes well by placing the logs crossing one another. It is best to use less wood so the fire doesn’t smolder and produce dark grey, yellowish or black smoke. Cooking temperature will depend somewhat on your pit and personal preference. Many cook at 225-250 degrees, which is a good range for basic, low-and-slow backyard barbecue. At that temperature, a 12-pound brisket could take 8-12 hours or longer, depending on how well you manage the fire, 4-5 hours in 250-degree smoke and 4-5 hours at 250-degrees wrapped in foil is an approximate timeline for a 12# packer brisket as long, as you maintain a steady 225-250-degree fire and are not opening the cook door. Others cooking with bigger pits cook hotter and faster (255-400 degrees) if their pits are designed to not burn the meat from radiant heat. Keep the fire from smoldering by maintaining a small burning flame. A smoldering fire produces off-flavors and creosote , which ruin the natural flavors of the meat and rub. Airflow is essential as is a clean fire to avoid pitchy, sooty, ashtray like flavors.
5. Place the meat on a clean cooking grate in the sweet spot of the pit -- where the temperature is most even -- away from the firebox and radiant heat.
6. Keep the pit as steady as you can at the target cooking temp. Here we assume somewhere in the range of 225 degrees to 250 degrees. AND do not open the cook doors for the first 4-5 hours PERIOD. Buy a digital temperature probe (Weber iGrill, Thermaworks, Maverick) to monitor the internal temperature of the cook chamber, and the brisket in the thickest part. Pit gauges are usually way off. Temperatures fluctuate 25-75 degrees depending on wind, ambient temps, humidity, wood and pit designs. These temperature fluctuations can create havoc for every backyard pitmaster. If your pit is running a 200-degrees on the grate but the pit gauge is reading 250, your brisket could take 3-6 additional hours to cook and might just end up dried out from being in the smoke that long - making for very disappointed guests.

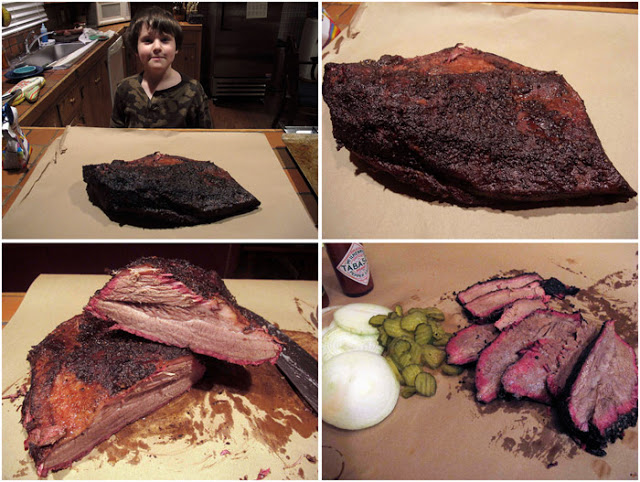
7. At the 4-5 hour mark the brisket should be 150-165-degrees internal temperature & in the stall. You should see a small puddle of water in the mid section of the brisket. . Wrap the brisket in foil when you think it's color and bark are where you want it. Dark mahogany-reddish brown with some black works for me. Return wrapped brisket to the sweet spot on the pit and maintain the pit temperature at 225-250-degrees.
8. Knowing when the brisket is done is a very crucial step. BE PATIENT! Do not try to cook a brisket based only on time. You can roughly estimate when a brisket will be done by allowing 45 minutes to 75 minutes per pound when cooking at 250 degrees and wrapping in foil after 4-5 hours. But ambient temperature, wind, humidity and composition of the meat tissue all are factors in how fast, or slow, a brisket cooks.
To really nail the finish, use some or all of the following tests:
--Use a good handheld temp probe like a Thermapen. Briskets "usually" become butter tender at 198-205 degrees, plus/minus. But not always. They might get tender at a lower temp, say 185, or a higher temp, 210, depending on the composition of the meat.
-- Don't rely on temp alone. Use the probe to test resistance in the meat, too. If the probe slips in and out of the flat, or lean, end of the brisket and the thick, fatty end, or point, without any resistance, that's what you're looking for: Butter tender.
--Using heat resistant gloves, develop your sense of touch for when a brisket feels like it's done. When it's still in foil, press it with a finger. There should be some give. Lift the wrapped brisket off the grate. If it's still stiff, it's not done. It should be very floppy.
--Once you think it's done, use your eyes to make sure. Partially unwrap the brisket. It should have a floppy consistency like Jello when it's still hot. After the brisket cools it will lose this consistency.

9. When the brisket is butter tender, you're still not done. Unwrap it and place it back on the pit at a lower temp, say 175-200, and let it rest for an hour or two. Some people skip this step and rest the brisket in an ice chest for a couple of hours wrapped in towels. Just don't let the meat continue cooking and steaming itself or it will dry out and lose flavor. Letting the brisket rest in the pit unwrapped at a lower temp will help firm up the bark and prevent the meat from drying out.
10. After resting in the pit, pull the brisket off and let it rest tented in foil for another hour or so until it reaches 140-degrees. This allows the meat to cool and the juices to stabilize. You could pour a cup or so of the au jus on the meat at this point which will soak back into the meat. Now you're ready to carve and eat.
Follow the steps above and you should, with some practice, wind up with damn good brisket. Enjoy.

Smoke brisket in your backyard photos and story by Marshall Cooper
Editors note: Check out a great website for grilling and smoking equipment from our friends at Seriously Smoked, including this recent post on The Best Charcoal Grills for the Money.


